So you want to be a GNS3 hero… AWESOME! Let’s get started!
So the actual installation of GNS3 is incredibly simple. The hardest part is understanding the choices available to you and which best suits your needs. I am making the following assumptions about your needs for the purpose of THIS tutorial:
- You want a dedicated GNS3 box
- You are comfortable enough with Linux that you can (and did) install it on a dedicated machine
- You would like GNS3 to run as a service, tied to a specially created GNS3 user just to keep everything neat and tidy
- You love yourself and those around you enough that you chose the latest Ubuntu LTS as your platform
- You prefer to keep your masochism behind closed doors and aren’t going to try to integrate Docker
- You’re neither filthy rich nor a filthy pirate and don’t have any Cisco IOU images on hand… so we don’t really need to worry about that part either
- YOU UNDERSTAND THAT THIS IS FOR YOUR OWN PERSONAL LAB AND THERE ARE A LOT OF TECHNIQUES AND BEST PRACTICES LEFT OUT HERE FOR THE SAKE OF KEEPING IT SIMPLE / MY OWN IGNORANCE
That being said, this method should work fine in a virtual machine, but you may need to mess around with nested virtualization options. In fact, I am using a VM myself for this tutorial because I don’t really want to deal with the hassle of wiping and rebuilding my own server.
Now… let’s get on with it!
Step 1: Install it!
Okay, this is it. You can feel it, can’t you? Did you carb-load in anticipation of the marathon that is about to commence? I sure hope so! (Estimated time to complete step 1… about 30 seconds + whatever amount of time it takes Ubuntu to download and install everything for you).
sudo add-apt-repository ppa:gns3/ppa
sudo apt update
sudo apt install gns3-server
Press Enter to allow the repository to be added… press y to let the packages install… press Enter to let non-root users use Wireshark even though you don’t really need Wireshark here but this is easy mode tutorial so we’re just gonna roll with it.
Watch with great interest as each and every new package is installed. Riveting stuff.
Aaaaand, you’re done!
Step 2: Make the GNS3 user
sudo adduser gns3
sudo usermod -aG gns3,kvm,ubridge,gns3
WHEW! This is hard work, ain’t it? I trust you managed to figure out what to do when prompted to give a password for the new user. 🙂
Now, for clarity you don’t really need to log in with this user typically, and certainly not now. It exists solely to be used as a target for the service we’re about to create. Honestly, you don’t even NEED to do this step at all. You can use your normal user as the target, but I LIKE doing it this way and you made the mistake of reading MY tutorial.
Step 3: Make it a service
Use your favorite text editor (though I’ll judge you for using anything other than vim) to create the following file (gns3.service):
[Unit]
Description=GNS3 server
Wants=network-online.target
After=network.target network-online.target

[Service]
Type=forking
User=gns3
Group=gns3
PermissionsStartOnly=true
ExecStartPre=/bin/mkdir -p /var/log/gns3 /var/run/gns3
ExecStartPre=/bin/chown -R gns3:gns3 /var/log/gns3 /var/run/gns3
ExecStart=/usr/bin/gns3server --log /var/log/gns3/gns3.log \
 --pid /var/run/gns3/gns3.pid --daemon
ExecReload=/bin/kill -s HUP $MAINPID
Restart=on-abort
PIDFile=/var/run/gns3/gns3.pid

[Install]
WantedBy=multi-user.target
Copy that service to the appropriate location and enable it:
sudo cp gns3.service /lib/systemd/system/gns3.service
sudo systemctl enable --now gns3.service
sudo systemctl status gns3
You should be looking pretty with your fancy new service. Now stop it. Really though:
sudo systemctl stop gns3Configure GNS3
We’ll need to log in to the gns3 user real quick to do some customizations:
sudo su - gns3And now vim… I mean create the following file with your favorite vim editor (~/.config/GNS3/2.2/gns3_server.conf):
[Server]
path = /usr/bin/gns3server
ubridge_path = /usr/bin/ubridge
host = 0.0.0.0
port = 3080
images_path = /home/gns3/GNS3/images
projects_path = /home/gns3/GNS3/projects
appliances_path = /home/gns3/GNS3/appliances
additional_images_paths =
symbols_path = /home/gns3/GNS3/symbols
configs_path = /home/gns3/GNS3/configs
report_errors = True
auto_start = True
allow_console_from_anywhere = False
auth = True
user = admin
password = getyourownpassword
protocol = http
console_start_port_range = 5000
console_end_port_range = 10000
udp_start_port_range = 10000
udp_end_port_range = 20000
Now go back to your main user account, start the gns3 service and you should be good to go!
exit
sudo systemctl start
You should now be able to access your GNS3 instance at http://<your_server_ip_here>:3080 with the credentials admin/getyourownpassword .
Install the client and related tools
I imagine you’ll want to use the GNS3 client more often than the web interface however. If your daily driver is ALSO Ubuntu (yay Linux!) then just hit up your local terminal and type:
sudo apt install gns3-gui
sudo apt install wireshark
Again, make sure you permit wireshark for non-root. Make sure you are part of the wireshark group:
groups
# If you're NOT part of the wireshark group, do this:
sudo usermod -aG wireshark username
You will need to log-out / log-in to get the newly added group to take effect.
However, if you are on Windows you’re gonna want to go download and install the GNS3 client, but you’re going to take off the bits you don’t need:
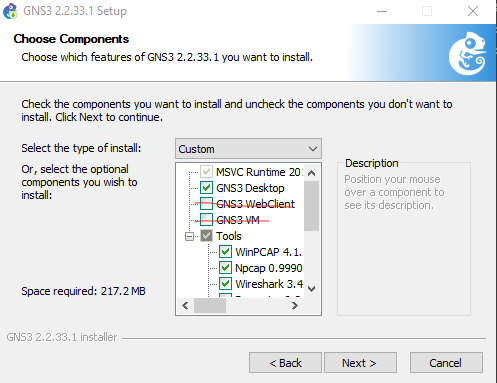
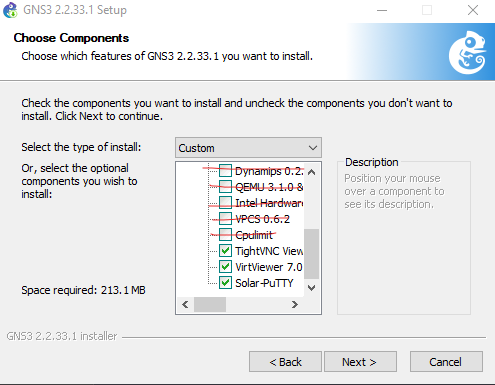
By the way, if you already have things like TightVNC, Wireshark, etc. then you can leave off those components as well. The takeaway here is that you only need the client components and related tools. Nothing that has anything to do with the server portion is required becasue, well, you already installed the server on your fancy dedicated machine (or VM if you went that route).
Now when you start the client for the first time you’ll eventually be prompted with the following dialog box:
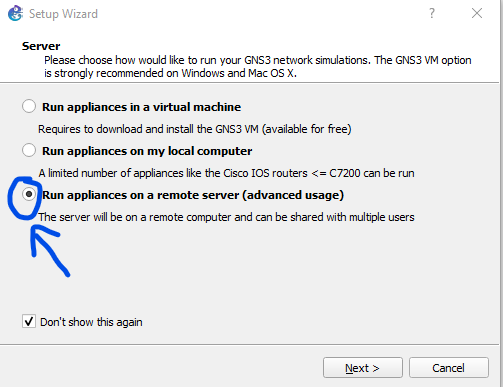
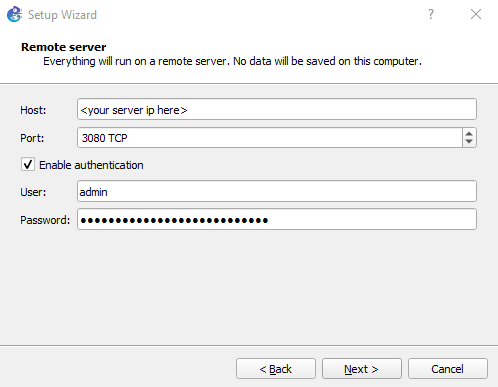
Select what it thinks is the “advanced usage” option (but really, this has been WAY less of a headache for me than trying to do the default option). Then fill in the relevant details here:
And that’s it! You should be ready to rock and actually roll!